Home > Flash Video MX Std > Tutorial


Output File setting
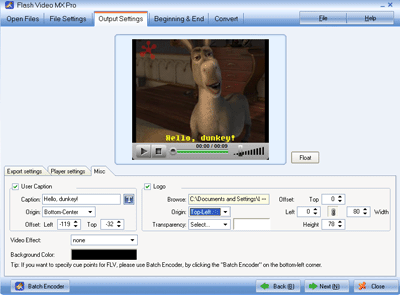
User Caption: Check to add caption to your video. Type the caption text you want to add and click the "T" to choose the font you prefer.
Origin: Select the origin position for your caption.
Offset: Change the values to specify the exact position of the caption.
LOGO: Check to add your LOGO to your video. Click the Browse button to select your LOGO icon from your hard disc.
Origin: Select the origin position for your LOGO.
Offset: Change the values to specify the exact postion of the LOGO. The "T" and "L" are for the distance from the origin, and the "Width" and "Height" are for the size of the LOGO.
NOTE:The "hold-down" status is to keep the original aspect ratio of the watermark image.
Transparent: Click "None" if you don't want to set any color to be transparent. Click "Select", and you will see the window about transparency pop up. There are two methods of selecting the transparent color.
Use your mouse to click a pixel from the picture on the left, and the color will be shown on lower left part of the window. Change the values in the boxes for "R" (Red), "G" (Green) and "B" (Black) to set the transparent color, if it is available in the picture.
Tolerance: Drag the bar to change the tolerance of the transparent color and get the effect you like.
Video Effect: You can add some animated effects such as snow, flower, leaf, etc. to you video. Click "Video effect" drop-down list and select the effect you prefer. We will release more effects on our website from time to time. You can always visit our website to update your video effects for free, Video effect is grayed, if you choose the flv. format.
Background Color: Click to set the background color for your output file.
NOTE:If you want to specify cue points for FLV, please use Flash Video MX-Batch Encoder, by clicking the "Run Batch Encoder" on the bottom left corner.